

A pond testing kit is your secret weapon for keeping koi healthy. It's the only way to measure critical water parameters like ammonia, nitrite, nitrate, and pH. Think of it as a diagnostic tool for your pond's ecosystem, letting you spot invisible chemical problems before they harm your fish.
Understanding Your Pond's Hidden Chemistry
Even when your pond water looks crystal clear, it can hide serious dangers. A thriving pond is a delicate balancing act where invisible chemical reactions happen constantly. Understanding this hidden chemistry is the first step towards proactive pond keeping.
At the heart of it all is the nitrogen cycle. Fish waste and leftover food break down and release ammonia, which is highly toxic. In a healthy pond, beneficial bacteria convert that ammonia into nitrite—still very dangerous. Then, a second type of bacteria converts the nitrite into the much safer nitrate, which pond plants can use as fertiliser. A pond testing kit is your only window into this vital process.
Why Guesswork Is Dangerous
Without regular water testing, you're flying blind. You won't know there's a problem until your fish show signs of distress, which is often too late.
- Lethargic Fish: Koi hanging listlessly at the surface or gasping for air is a classic sign of high ammonia or nitrite levels, which burn their gills and stop them from absorbing oxygen.
- Sudden Algae Blooms: An explosion of green water is often a red flag for high nitrate or phosphate levels, which act like a super-fertiliser for algae.
- Unexplained Illness: Poor water quality is a major stressor for fish. It weakens their immune systems, leaving them vulnerable to diseases and parasites.
A common mistake is reacting to problems instead of preventing them. Regular water testing puts you in control, allowing you to fix tiny imbalances before they become an emergency.
Don't see your testing kit as a chore; see it as an early warning system. It translates your pond's silent chemistry into data you can use. For example, a small spike in ammonia after adding new fish shows your biological filter is struggling. That's your cue to cut back on feeding or add a bacterial booster. This insight shows why a reliable pond testing kit is the most important gear for any serious pond owner.
How to Choose the Right Pond Testing Kit
Choosing the right pond testing kit isn’t about grabbing the most expensive one; it’s about finding a kit that fits your pond, routine, and confidence level.
The choice boils down to three main types: liquid drop tests, simple dip strips, and digital meters. Each has pros and cons. A dedicated koi keeper with high-value fish will prioritise accuracy. In contrast, someone with a small wildlife pond might just need a quick weekly check-up.
This handy image helps to visualise which water parameters are most critical to keep an eye on.
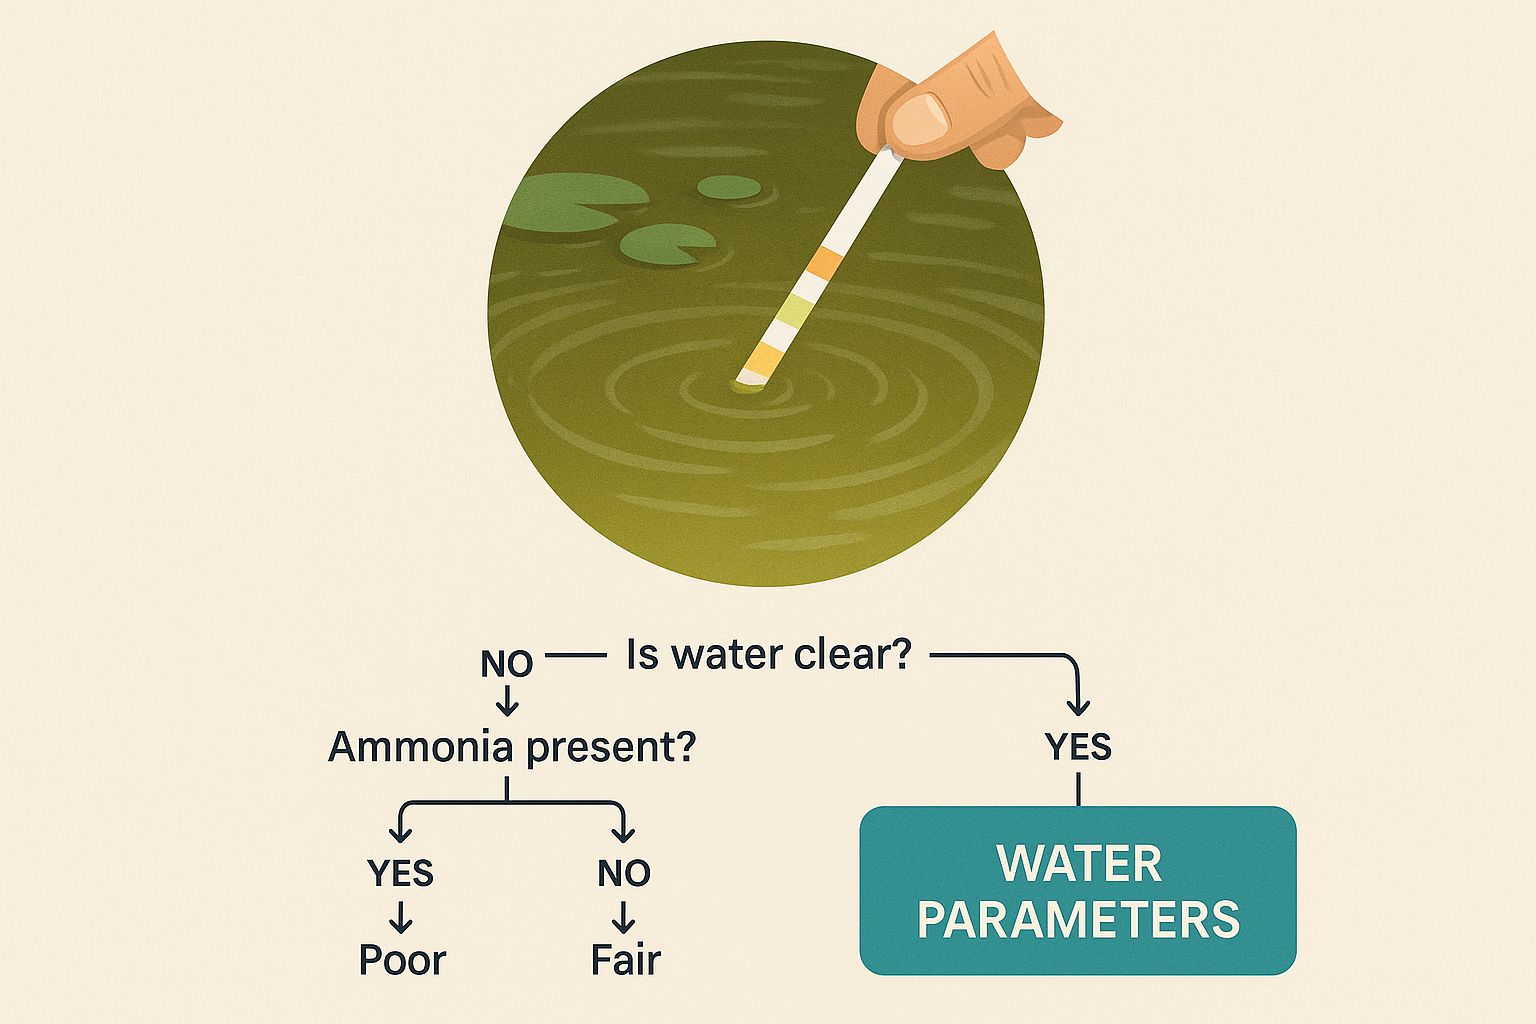 By focusing on key indicators like ammonia, nitrite, and pH, you can get a clear snapshot of your pond's health with every test.
Liquid Drop Kits: The Gold Standard for Accuracy
For most serious pond owners, especially those keeping koi, a liquid "master" test kit is the go-to choice. These kits involve adding reagent drops to a water sample and comparing the resulting colour to a chart.
They require more effort, but their accuracy is second to none. This precision is vital for parameters like ammonia, where a small, incorrect reading could lead to a delayed—or unnecessary—intervention. Ultimately, they provide the most reliable data for making informed decisions.
If you're looking for an in-depth look at different options, check out our guide to the best water testing kit for ponds.
Test Strips: The Quick and Easy Option
Test strips are the simplest type of pond testing kit. You dip a strip into the pond water, wait a moment, and compare the coloured pads to a chart.
- Pros: They are fast, convenient, and usually the most affordable option. They're great for a quick, general overview of your pond's condition.
- Cons: Their biggest drawback is a lack of precision. The colour blocks can be tricky to interpret, making it hard to distinguish between "safe" and "caution" levels.
They are best suited for well-established, lightly stocked ponds where you’re just confirming that everything is stable.
Digital Meters: Precision at a Price
At the high end of the spectrum are digital meters. These electronic devices give a precise numerical readout, eliminating the guesswork of colour matching. You simply dip the probe into the water for an exact measurement.
Digital testers offer incredible accuracy but are often single-parameter devices. This means you may need separate meters for pH, ammonia, and other readings, which can become costly. They are a fantastic tool for breeders or advanced hobbyists who require pinpoint data.
To make the decision easier, here's a quick-glance comparison.
Comparison of Pond Testing Kit Types
| Kit Type | Best For | Accuracy | Ease of Use | Typical Parameters |
|---|---|---|---|---|
| Liquid Drop Kits | Serious koi keepers, diagnosing specific issues | Very High | Medium | Ammonia, Nitrite, Nitrate, pH, KH |
| Test Strips | Quick weekly checks, beginners, wildlife ponds | Low | Very High | pH, Nitrite, Nitrate, Hardness |
| Digital Meters | Advanced hobbyists, breeders, pinpoint accuracy | Highest | High | Usually single-parameter (e.g., pH, TDS) |
Ultimately, the right kit is the one you will use consistently. Whether you opt for a liquid kit or a strip, regular testing is key to a healthy pond.
Getting Accurate Results from Your Test Kit
Owning a pond testing kit is a brilliant first step, but how you use it truly protects your fish. Accurate results come down to a few critical details. Nailing these techniques means the data you collect gives a true picture of your pond's health, turning guesswork into confident action.
An inaccurate reading can be worse than no reading at all, potentially leading you to fix a problem that doesn't exist or miss one that's brewing.
Mastering the Water Sample Collection
First, you need a representative water sample. Scooping water from the surface or a waterfall cascade is a common mistake. This water is usually more oxygenated and might not reflect the real conditions below.
For a more accurate picture:
- Go Deeper: Plunge your test vial or collection pot at least elbow-deep into the main body of the pond to get past the unrepresentative surface layer.
- Avoid Skimmers and Returns: Steer clear of collecting water right next to your skimmer's intake or filter's return pipe.
- Rinse and Repeat: Always rinse the test vial with pond water a couple of times before taking the final sample. This removes any residue that could throw off your results.
Preventing Cross-Contamination and Reading Errors
Once you have your sample, keeping it pure is key. Cross-contamination is a common culprit behind strange test results. If you're using a liquid pond testing kit, even a tiny drop of the wrong reagent can mess up the test.
Always use the right cap for each vial and rinse them thoroughly with tap water after every use. Let them air dry completely before storing them.
When it's time to read the results, especially with colour-comparison charts, your surroundings make a massive difference.
The secret to accurate colour matching is consistent lighting. Always read your results against a plain white background in natural daylight, but not in direct, harsh sunlight. Artificial indoor lighting often has a yellow or blue tint that can make it nearly impossible to distinguish between similar shades on the chart.
This level of care isn't just for pond water. Getting reliable data is just as vital when testing garden soil. You can find some fantastic tips for accurate results from soil testing, where the same principles of careful sampling apply.
This attention to detail is crucial for all testing. If you use a digital meter, calibrate it regularly. If you rely on test strips, including specialised ones for salt levels, check they haven't expired. For instance, keeping a fresh supply of Chloride salt replacement test strips ensures trustworthy salinity readings. By building these habits into your routine, you can guarantee that every test gives you clear, actionable information.
How to Interpret Your Test Results and Take Action
Getting numbers from your pond testing kit is only half the battle. Knowing what they mean and how to react is where you truly safeguard your fish. This is where data becomes an action plan for a healthier pond.
Once you demystify the results, you can confidently tackle water quality problems before they escalate. Think of these parameters as your pond's vital signs. Each tells a unique story, and when one is off, it’s a clear signal your pond needs help.

Key Pond Water Parameters and Ideal Ranges
Here’s a quick reference table to help make sense of your readings. It breaks down the most important parameters, ideal ranges for koi, and what to do if your numbers are in the danger zone.
| Parameter | Ideal Range (for Koi) | Significance | Action if Unsafe |
|---|---|---|---|
| Ammonia (NH3) | 0 ppm | Highly toxic fish waste. Causes gill damage and severe stress. | Perform an immediate 25-30% water change. Add a bacterial booster to support your filter. |
| Nitrite (NO2) | 0 ppm | Very toxic. Prevents blood from carrying oxygen, causing suffocation. | Perform an immediate water change. Add pond salt to help protect fish from its effects. |
| Nitrate (NO3) | Below 50 ppm | Less toxic plant fertiliser. High levels fuel algae blooms and can stress fish. | Conduct regular partial water changes to dilute nutrient buildup. |
| pH | Stable between 7.0-8.5 | Measures acidity/alkalinity. Sudden swings are more dangerous than a specific number. | Use KH buffers to raise low pH slowly. Perform water changes to lower high pH. |
Understanding these basics is the first step, but let's dive into what these readings really mean.
Decoding Ammonia Readings
Ammonia (NH3) is public enemy number one in a koi pond. It’s a direct waste product from your fish and is incredibly toxic. Your goal for ammonia in any established pond should always be zero. A reading above 0.25 ppm (parts per million) is a serious warning.
- Immediate Action: The first step is a 25-30% partial water change. This immediately dilutes the concentration. Always use a high-quality dechlorinator.
- Long-Term Fix: An ammonia spike means your biological filter is struggling. Perhaps the pond is new, you've added too many fish, or you've over-cleaned the filter. Support your filter by adding a bacterial booster.
Tackling Nitrite Spikes
Nitrite (NO2) is the second stage of the nitrogen cycle, and it's also extremely toxic. It damages koi's blood, preventing it from carrying oxygen properly. This is why you might see fish gasping at the surface—they're suffocating. Like ammonia, the target for nitrite is zero.
Any reading above zero is a cause for concern. Nitrite poisoning, often called "brown blood disease," can be fatal. It’s a clear sign the second stage of your biological filter isn't keeping up.
Your response should be similar to an ammonia spike. A quick partial water change will provide immediate relief. You can also add a small amount of pond salt, as this helps protect the fish from the effects of nitrite while your filter catches up.
Managing Nitrates
Nitrate (NO3) is the final product of the nitrogen cycle and is far less harmful. In fact, pond plants use it as a fertiliser. The problem is when levels get too high, which can stress your koi and fuel rampant algae growth.
Aim to keep nitrate levels below 50 ppm. If they start creeping higher, nutrients are building up too quickly. The most effective way to keep nitrates in check is through regular partial water changes.
Stabilising Your Pond pH
The pH scale measures how acidic or alkaline your water is, with 7.0 being neutral. For koi, a stable pH between 7.0 and 8.5 is perfect. The real danger isn't a specific number but a sudden crash or spike, which is incredibly stressful for fish. Stability is everything.
If your pH is too low (acidic), a common culprit is low carbonate hardness (KH). You can gently raise it with a KH buffer. If it's too high, a partial water change can help bring it down. The golden rule? Always make pH adjustments slowly.
This methodical approach of testing, interpreting, and acting isn't unique to pond keeping. Gardeners do much the same when it comes to soil testing at home. For more specific concerns, you can even find a metals replacement test for iDip kits to check for other potential contaminants.
Creating a Consistent Pond Testing Routine
The secret to preventing major pond problems isn't dramatic rescues; it's simple consistency. A regular testing schedule turns water care into a proactive habit. You’ll start to understand the unique rhythm of your pond’s ecosystem.
This routine doesn't need to be excessive. The frequency of your tests will shift depending on the season and the life stage of your pond.

Tailoring Your Testing Frequency
Your schedule has to be flexible. A new pond that's still 'cycling' needs a close eye. Daily checks for ammonia and nitrite are essential during this phase. Once your pond is mature, you can ease off.
Here’s a rough guide:
- Spring & Summer: During warmer months, fish are active and you’re feeding them heavily. A weekly test is a great baseline to catch nutrient spikes before they fuel an algae bloom.
- Autumn & Winter: As temperatures drop, your pond’s metabolism slows. Fish eat less and produce less waste. You can pull back your testing to once every two to four weeks. A floating pond thermometer will help gauge when this slowdown is starting.
- After Big Changes: Always test more after a significant event. If you've added new fish, treated the pond with medication, or deep cleaned your filter, test every day or two until things settle.
The Power of a Pond Logbook
One of the most valuable tools, alongside your pond testing kit, is a simple logbook. A basic notebook or spreadsheet will do the job.
Keeping a log of your test results helps you spot subtle trends over time. You’ll see how a heatwave affects your pH or how nitrate levels creep up before a water change is due. This historical data is your personal guide to anticipating issues before they become emergencies.
By logging your results, you’re adopting the same principles of consistent data collection used to protect our wider ecosystems.
Common Questions About Pond Water Testing
Even with a solid routine, questions can pop up. Let's tackle some of the most frequent queries to help you manage your pond's health with confidence.
How Often Should I Really Test My Pond Water?
For a healthy pond, testing once a week during spring and summer is a great baseline. However, you need to test more frequently in specific situations:
- When a new pond is cycling.
- Immediately after introducing new fish.
- Following any medication treatment.
- If you spot any signs of fish distress or if water clarity suddenly drops.
Once winter arrives, you can ease off to every two to four weeks.
My Test Kit Results Seem Wrong. What Should I Do?
If a reading seems off, don't panic. First, check the expiration date on the pond testing kit reagents. Out-of-date chemicals are a common culprit for strange results.
Next, double-check that you're following the instructions exactly. The amount of water, number of reagent drops, and waiting times are all critical. Also, shake the reagent bottles thoroughly before use. If you’re still unsure, take a water sample to your local aquatic shop for a second opinion.
A common mistake is misinterpreting results due to poor lighting. Always read your test against a plain white background in natural daylight to see the colours accurately.
Can I Use an Aquarium Test Kit for My Pond?
Yes, absolutely. A good quality freshwater aquarium 'master' test kit is perfectly suitable for a garden pond. The core parameters you need to measure—Ammonia, Nitrite, Nitrate, and pH—are identical for both environments.
Consistent care goes hand-in-hand with testing. Automating feeding with tools like an AquaForte auto fish feeder helps maintain stability by preventing overfeeding, a major cause of water quality issues.
Ready to take control of your pond's health? Explore our professional-grade water care solutions and testing equipment at Hatton Koi. Shop now at https://hattonkoi.com and ensure a thriving environment for your koi.